How to Make Portable Software
How to Make Portable Software with Turbo Studio
Portable applications are a great way to take your software with you wherever you go without needing to install it on every computer you use. In this tutorial, we’ll show you how to use Turbo Studio to create portable versions of your favorite applications.
What is Turbo Studio?
Turbo Studio is a powerful application virtualization tool that allows you to create portable software packages that can run without installation. With Turbo Studio, you can package your applications and their dependencies into a single executable file that can be run on any Windows computer.
Getting Started
To get started with Turbo Studio, you’ll need to download and install the application from the official website. Once installed, launch Turbo Studio and you’ll be greeted with a welcome screen. From here, click on the “Create New Project” button to start creating your first portable application.
Selecting Your Application
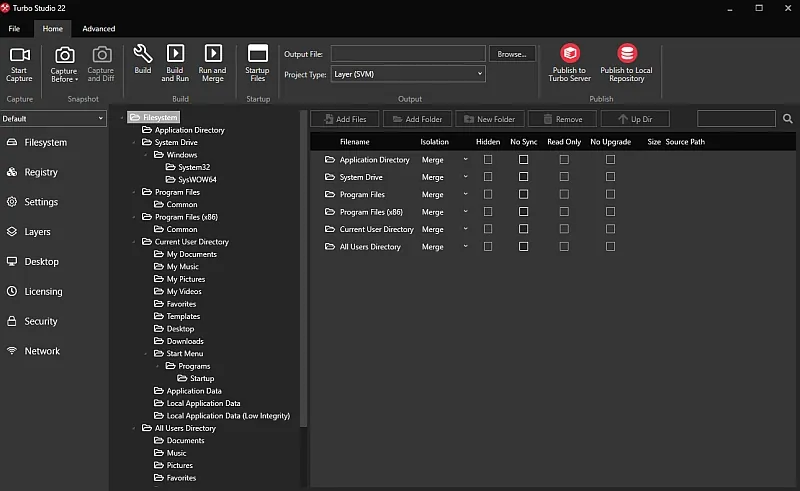
The first step in creating a portable application with Turbo Studio is selecting the application you want to package. Click the “Browse” button and locate the executable file (.exe) for the application you want to package. Once you’ve selected the application, Turbo Studio will analyze its dependencies and create a project for you. Recent versions of Turbo Studio added a convenient “Start Capture” button that captures your app without making system snapshots before and after installation.
Customizing Your Application
Now that you have your application loaded into Turbo Studio, you can customize it by adding registry keys, file associations, and other settings. This ensures that your application runs exactly how you want it to, regardless of where it’s executed.
Adding Dependencies
One of the most important steps in creating a portable application is ensuring that all the necessary dependencies are included. These dependencies can include DLLs, configuration files, and other components required by the application to function properly.
To add dependencies to your application, simply install them during the setup process, Turbo Studio is configured to automatically detect dependencies during the packaging process.
Building Your Portable Application
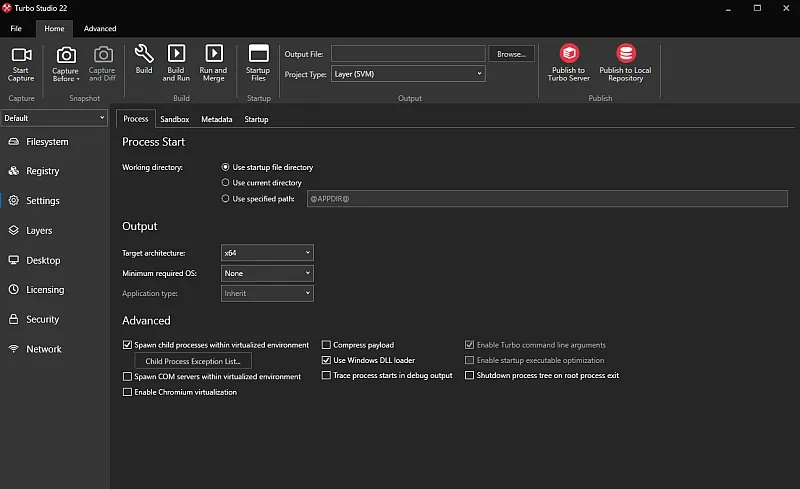
Once you’re satisfied with the configuration of your portable application, it’s time to build it. Click the “Build” button in the Project Editor to start the packaging process. Turbo Studio will compile all the necessary files and components into a single executable file that you can run on any Windows computer.
Using Your Portable Application
With your portable application packaged and ready to go, all you need to do is copy the executable file to a USB drive or other portable storage device. You can then plug it into any Windows computer and run the application without needing to install it.
Updating Your Portable Application
If you need to update your portable application, simply open the project in Turbo Studio and make the necessary changes. You can then rebuild the application to create a new portable executable file with the updated version.
Conclusion
Creating portable applications with Turbo Studio is simple and straightforward. By following the steps outlined in this tutorial, you can easily package your favorite applications and take them with you wherever you go. Whether you’re a developer looking to distribute your software, or just someone who wants to use their favorite applications on multiple computers, Turbo Studio provides a powerful solution for creating portable software packages.
You can download Turbo Studio….HERE
How to Make Portable Software with Cameyo
There are several methods you can use to make portable software and several tools can be used. I would like to focus this tutorial on one specific program I really love and use every day…CAMEYO.
It has a fast learning curve and you can “release” your portable apps in a few minutes. People at CAMEYO offer a fully functional FREE version of their software altough, for extreme customizations of the packages created by CAMEYO a license is more than reccomended and far cheaper than competing programs.
The process of turning a program into a portable software is called “packaging”. The process consists of making a snapshot of your system before the installation of the program you want to make “portable” then Cameyo “captures” the installation and it “packages” all the differences that the program setup has made in your sytem giving you a ready to run portable app. Once this step is done, you will be able to use this software on any machine without having to re-install it again. Also, portable apps created by CAMEYO can work in “isolated mode”, never interfering with your Windows stability (unlike regular software).
Cameyo is arguably the simplest application virtualization software for creating and editing virtual software packages. Just follow the below simple steps.
Note: packaging has to be done on a clean virtual machine (I personally use VMWARE Workstation and Operating System only without any additional software installed on it). Avoid packaging on your own machine or any machine which has other software & components installed on it. It doesn’t harm your computer but if , for example, the program you are packaging requires some runtime files to work and your own “regular” system already has them installed…the setup won’t install them and you won’t be able to run the portable app on a different system that doesn’t have those runtimes.
1. Launch Cameyo and select “Capture an installation” in the startup menu:

2. Wait for the Packager to capture a pre-installation snapshot of your system in its current state.

3. Once the snapshot is taken, the following window will appear:

At this point, install the software you wish to package (setup, registration, custom settings…everything is captured by CAMEYO).
4. When your software finished installing, press “Install done” on Cameyo’s packager window you see at the bottom right corner of your screen. Cameyo will again take a few minutes to establish a snapshot of your system (this time post-installation) and analyze the differences.
5. You’re done! The package is placed under the “My documents\Cameyo packages” folder:
Unlike other portable software maker tools, Cameyo does not require you to edit every virtual package you create. The program is ready to be run but almost always you will want to customize the “package”, removing un-needed files (uninstallers for example).
You can edit a package either by dragging it into the Cameyo.exe executable OR by launching Cameyo and selecting “Edit a package”.
Once the package opened, the screen will look as follows:
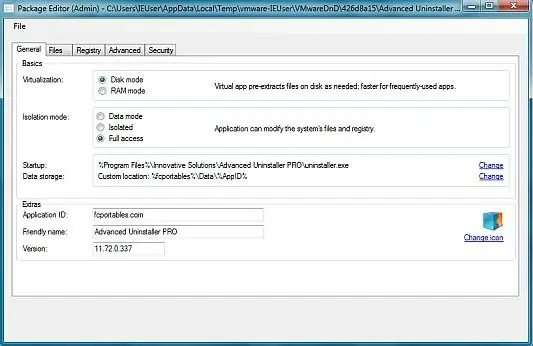
From that screen you can edit every aspect of your portable app…icons, memory management, where to save settings, isolation mode…and much more.
CAMEYO is a really powerful tool to make portable software. People at CAMEYO is responsive and they have a support forum where you can take advantage of other “portable makers” experience.
You can download CAMEYO…HERE
How to Make Portable Software with ThinApp
Before we start, let me first explain what ThinApp is and why it’s useful for creating portable software.
ThinApp is a software packaging tool that enables you to create portable applications that can run on any Windows operating system without requiring installation. This means that you can package your application into a virtual container and distribute it to users as a single executable file.
Creating portable software with ThinApp has several benefits, including:
- Flexibility: Users can run the application from a USB drive or network share, without needing to install it on their computer.
- Portability: The application can be easily moved between computers, making it ideal for use in environments where users frequently switch devices.
- Security: Since the application runs in a virtual environment, it is isolated from the host operating system and less vulnerable to attacks.
Now that you understand the benefits of using ThinApp, let’s move on to the step-by-step guide on how to create your own portable software using ThinApp:
Step 1: Install ThinApp
The first step is to download and install ThinApp on your computer. You can download the latest version of ThinApp from the VMware website. Once the installation is complete, launch ThinApp and click on the “Capture” button to begin creating your package.
Step 2: Capture the Application
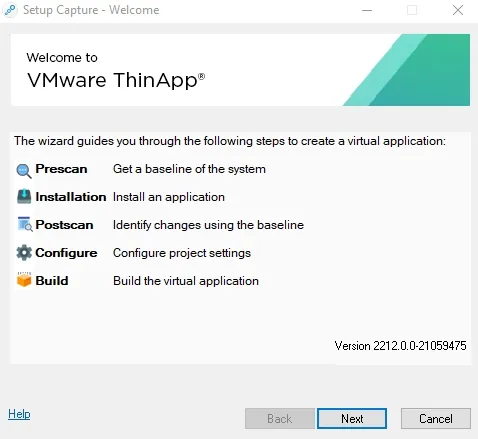
1) Next, you need to capture the application that you want to make portable. To do this, follow these steps:
2) Click on the “Next” button to create a new project.
3) Click on the “Prescan” button.
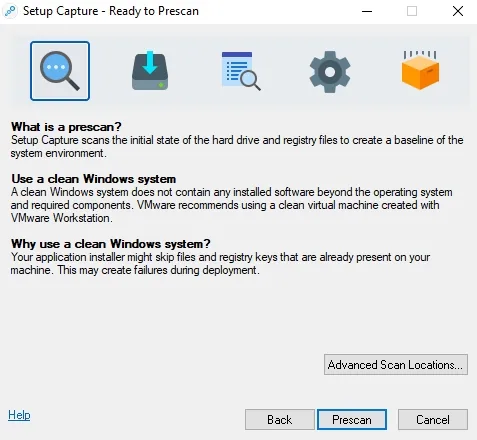
4) Run the installer for the application and follow the prompts to install it in the virtual environment.
5) Once the installation is complete, click on the “Postscan” button to begin capturing the changes made by the installer.
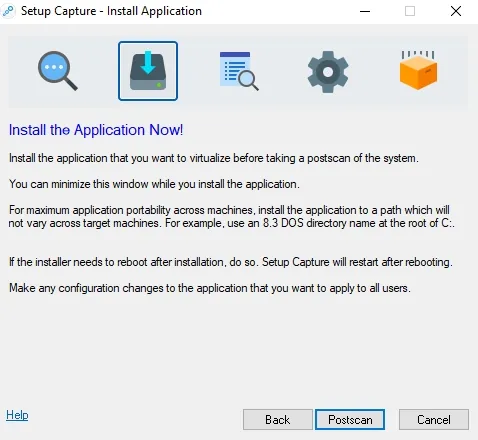
Review the changes made by the installer and verify that all necessary files and registry entries have been captured.
Click on the “Build” button to build the package.
Step 3: Test the Package
Once the package has been built, you can test it to ensure that it works correctly. To do this, follow these steps:
- Copy the package to a test machine.
- Double-click on the executable file to launch the application.
- Verify that the application runs correctly and that all features are working as expected.
- Test the application on different machines to ensure that it works on all supported operating systems.
Step 4: Distribute the Package
Finally, you can distribute your portable application to users. There are several ways to distribute your package, including:
- Hosting the package on a network share and providing users with a shortcut to the executable file.
- Distributing the package on a USB drive or other portable media.
- Providing users with a download link to the package on a website.
When distributing the package, keep in mind that it may require specific operating system versions or dependencies. Be sure to inform users about any requirements before they attempt to run the application.
Conclusion
In conclusion, ThinApp provides an easy way to create portable software that can be used on any Windows operating system without requiring installation. By following the steps outlined in this tutorial, you can quickly and easily create your own portable applications for distribution to users. Remember to always test your application thoroughly before distributing it to ensure that it works correctly on all supported operating systems.
How to Make Portable Software in Portableapps Format
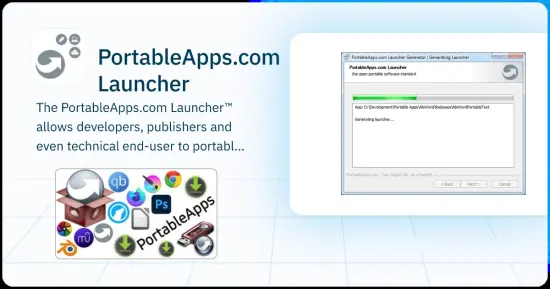
1. Understanding the PortableApps.com Format
PortableApps‑formatted applications follow a standardized structure designed to ensure portability, clean updates, and compatibility with the PortableApps Platform.
1.1 Standard Folder Layout
AppNamePortable\
 ├── App\
 ├── Data\
 ├── AppInfo\
 ├── Other\
 ├── Help\
 └── AppNamePortable.exe
1.2 Folder Purpose Overview
- App\ — Contains the program’s binaries and supporting files.
- Data\ — Stores user data and settings; preserved during updates.
- AppInfo\ — Metadata, icons, and configuration files.
- Other\ — Optional extras (source code, legacy configs, etc.).
- Help\ — Documentation for the user.
- AppNamePortable.exe — The launcher generated by PAL.
1.3 Why This Structure Matters
- Ensures portability across drives and systems
- Prevents writes to the host machine
- Keeps user data separate from program files
- Enables clean updates and platform integration
2. Building the AppInfo Folder and Metadata
The AppInfo folder defines how your app appears and behaves inside the PortableApps Platform.
2.1 Typical Contents
AppInfo\
 ├── appinfo.ini
 ├── appicon.ico
 ├── appicon_16.webp
 ├── appicon_32.webp
 ├── appicon_128.webp
 └── splash.jpg (optional)
2.2 Example appinfo.ini
[Format]
Type=PortableApps.comFormat
Version=3.9

[Details]
Name=ExampleApp Portable
AppID=ExampleAppPortable
Publisher=Example Developer & PortableApps.com
Category=Utilities
Description=Sample portable app.

[Version]
PackageVersion=1.0.0.0
DisplayVersion=1.0

[Control]
Icons=1
Start=ExampleAppPortable.exe
2.3 Icon & Splash Guidelines
- Use multi‑resolution ICO files (16–256 px).
- PNGs are used for menu thumbnails.
- Splash images are optional but recommended.
3. Creating the PortableApps Launcher (PAL)
PAL (PortableApps Launcher) handles portability logic, path redirection, registry cleanup, and environment variables.
3.1 Installing PAL
- Download the PortableApps.com Launcher.
- Extract it to your development folder.
- Locate
PortableApps.comLauncher.exe.
3.2 Creating launcher.ini
Place this file in the root folder:
AppNamePortable.ini
3.3 Minimal launcher.ini Example
[Launch] ProgramExecutable=App\ExampleApp\ExampleApp.exe
DirectoryMoveOK=yes
SupportsUNC=yes

[DirectoriesMove]
AppData=%PAL:DataDir%\AppData

[RegistryKeys]
AppSettings=HKCU\Software\MyPortableApp
3.4 Building the Launcher
- Run
PortableApps.comLauncher.exe. - Select your app folder.
- PAL compiles
AppNamePortable.exe. - Test from multiple locations (USB, different drives).
4. Using Custom.nsh for Advanced Behavior
Custom.nsh extends PAL with NSIS scripting for pre‑launch and post‑launch actions.
4.1 Common Uses
- Setting environment variables
- Cleaning temporary files
- Adjusting paths dynamically
- Running pre‑launch checks
4.2 Example Custom.nsh
!macro CustomCodePre
StrCpy $0 "$EXEDIR\Data\Temp"
IfFileExists "$0\*" 0 +2
RMDir /r "$0"
!macroend

!macro CustomCodePost
MessageBox MB_OK "MyPortableApp has closed successfully!"
!macroend
5. Testing and Packaging
5.1 Testing Checklist
- Run from multiple drives
- Confirm no data is written outside the app folder
- Verify registry cleanup
- Ensure settings persist in
Data\ - Test on a clean Windows installation
5.2 Packaging
You may distribute your app as:
- A
.zipor.7zarchive - A
.paf.exeinstaller (optional, since you requested to skip installer.ini)
6. Best Practices
- Keep all user data inside
Data\. - Avoid absolute paths.
- Use PAL variables (
%PAL:AppDir%,%PAL:DataDir%). - Clean up temporary files.
- Include documentation in
Help\. - Follow PortableApps versioning conventions.
7. Troubleshooting & Common Mistakes
7.1 App Doesn’t Launch
- Check
ProgramExecutablepath - Verify files in
App\ - Test EXE directly
- Check for missing DLLs
7.2 Settings Not Saved
- Add correct
[DirectoriesMove]entries - Create matching folders in
Data\ - Check for writes to
%APPDATA%
7.3 Registry Not Cleaned
- Use Regshot to identify keys
- Add them to
[RegistryKeys]
7.4 Paths Break When Moving App
- Replace absolute paths using PAL’s
FileWriteN - Use
Custom.nshfor dynamic path fixes
7.5 Launcher Behaves Incorrectly
- Validate INI syntax
- Ensure macro names are correct
- Quote paths with spaces
7.6 App Writes Outside Folder
- Add missing redirections
- Clean temp files in
Custom.nsh
7.7 App Works on Your PC Only
- Bundle required DLLs
- Prefer x86 builds
- Avoid system‑installed dependencies
8. Final Checklist
Before release, verify:
- Folder structure is correct
- Metadata is valid
- Launcher builds cleanly
- No external writes occur
- Registry is cleaned
- App runs from any path
- Icons display correctly
- Works on a clean Windows install